Mac Os X Download for Vmware Player

Anda berbicara Bahasa Indonesia? Baca artikel terjemahannya di sini!
Believe it or not, macOS is the second most-used Desktop operating arrangement. As an alternative to Windows, I personally like the OS' peachy attending to details, its tight integration with the rest of Apple tree's ecosystem, and how its UNIX-based nature makes my job easier. Of grade, not everything is perfect. One thing that I despise Macs the about is, of course, its cost ;p. Well, aside from the discontinued so-called butterfly keyboards and Apple's zealous tendency to prevent people from upgrading or opening up their devices.
But despite its price, I'd argue that Macs are well worth their toll, especially as a work machine. Simply, for those on budget and really considering to buy a Mac, it doesn't hurt to accept a sneak peek of the operating system, see if y'all similar the wait and experience of it.
DISCLAIMER: Running Apple tree's operating systems outside of Apple hardware is violating Apple tree'southward license agreement and terms of use. Keep at your ain gamble.
Now, there are 2 means to run macOS outside Apple'south ecosystem:
Virtual Motorcar
This method is safer and more compatible, since information technology's running as an awarding inside your primary Bone. Only, beingness inside your main OS, the Virtual Machine will demand to share resource with your main Bone. If your PC's resources are limited, the functioning might not exist practiced.
Hackintosh
In case y'all don't know, the name comes from "hacking" your own PC to run macOS. And yes, this means that you'll be running macOS natively in your system. This ways your "mac" will go the best possible performance. The downsides? Since there aren't many variations to Mac hardware, compatibility listing is rather limited, and installing isn't exactly straightforward. So, if you're going this way, please brand sure your hardware is compatible.
I've really been thinking well-nigh going the second route, but unfortunately, the steps are a fleck… scary. Plus, my hardware is non compatible. So, in this article, I'm going to share about the VM road.
And so, shall nosotros?
What You Will Need
Earlier starting, you'll demand the following:
- VMware Workstation Thespian 16
- Auto Unlocker
- MacOS 10.15 Catalina ISO
- At to the lowest degree 4 core, 8 threads CPU
- At least 16GB of RAM
- At least 80GB of SSD space
For the ISO image, you tin download information technology from hither. It's a hefty eight.3GB file, so information technology's going to accept a while.
Every bit for the CPU, I'yard currently using the skilful ol' i7-4790 with 4 cores, 8 threads (by hyperthreading, a technology in which can double the load of each CPU, then 1 physical core is seen every bit 2 logical cores by the OS). I recommend to accept at to the lowest degree a quad-core CPU (with or without hyperthreading is fine, since, although limiting, a Mac with dual core CPU can still work).
In this instance, I'm going to divide my resource into 4 threads for each organisation, and so after, I'm going to make the Mac remember it has 4 logical cores.
Side by side, let me explain the final 2 requirements. While 4GB of RAM might work, most Macs start with 8GB of RAM, and so I'thou trying to replicate the same experience. As for deejay space, that depends on your usage. If yous intend to install lots of tools and libraries, you lot may demand more. For my use example, web and mobile programming, I still discover 80GB limiting. In fact, I event invested in a separate 250GB SSD, just for this VM. Concluding question, why SSD? Well, if yous're using SSD as your kick drive, I remember you should practise the same for the VM. Otherwise, you might be in for the worst test of patience in your life.
Installing macOS on VMware
Install VMware Workstation Actor xvi
VMware has a free version of their Workstation VM application called Histrion. Yous tin can download for free here. Please be informed that this guide is tested on version 16.1. Future versions may also work.
Apply the Auto Unlocker
Get to the unlocker's GitHub release folio here. My advice is to get the latest zip version if you lot're running Windows (1.1 at the time of writing). Once information technology'southward downloaded, excerpt / unzip the Unlocker, and you should find one executable file inside.
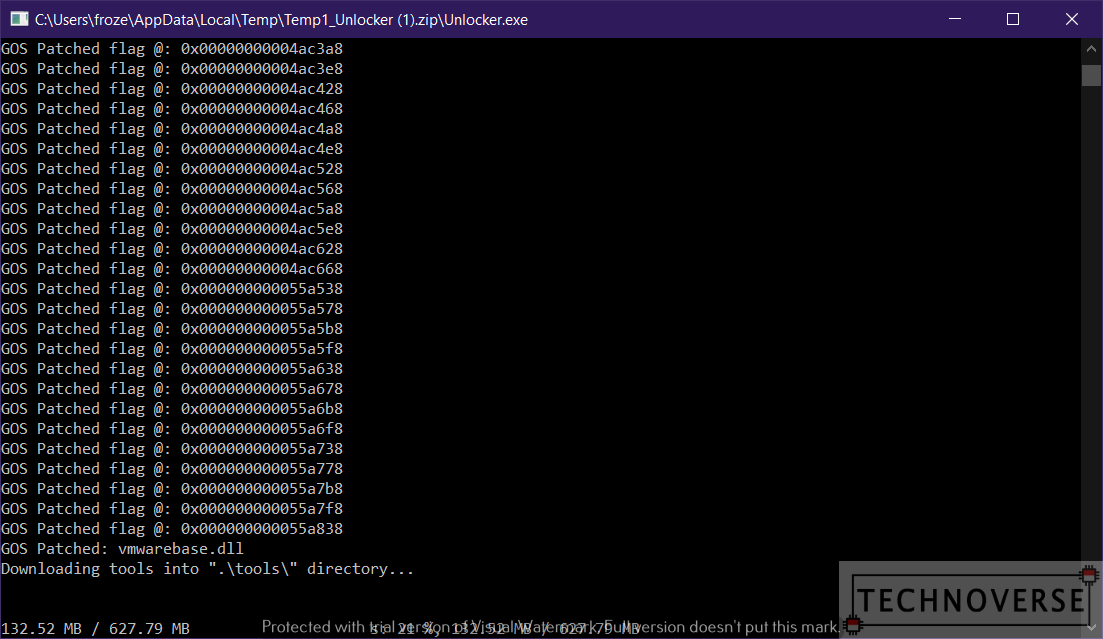
Before running the Unlocker, please make sure all VMware-related processes are killed. The Unlocker will attempt to patch the executables and download the necessary tools to run macOS VM in your PC. One time it's done, we can begin setting up our VM.
Create a New VM
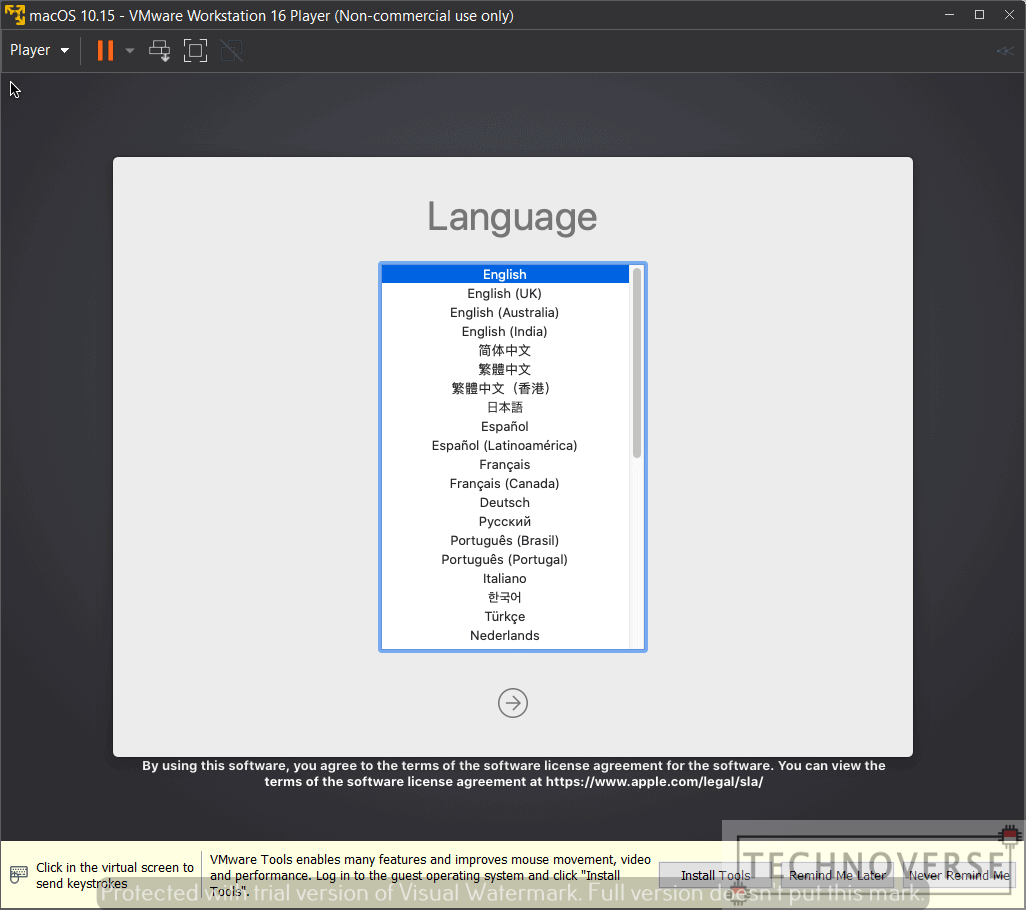
Please make sure yous've downloaded the ISO mentioned in the previous sections. To create a new VM, click the Create a New Virtual Machine push on the correct side of the VMware bill of fare. The first step is to select the OS installer. This is probably to make up one's mind the initial format for your VM'south hard disk. Since we're practically doing something that VMware does non originally support, please select I volition install the operating system later.

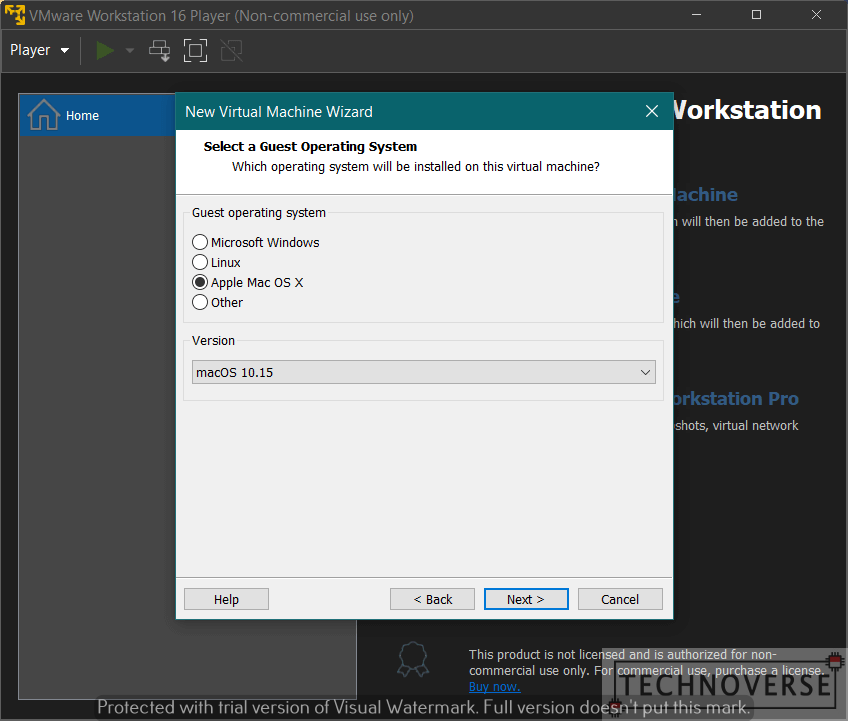
The side by side pace is to select the guest's operating arrangement. If yous applied the unlocker correctly, there should be Apple Mac OS X option. Please select that pick. As for the version, past default, information technology should refer to macOS 10.15. That'south the version we want to install (Catalina), so let information technology be.
Next, you lot'll need to give your VM a name, and a location. Please note that while it should exist possible to move a VM, I tried information technology once, and failed… so please choose wisely.

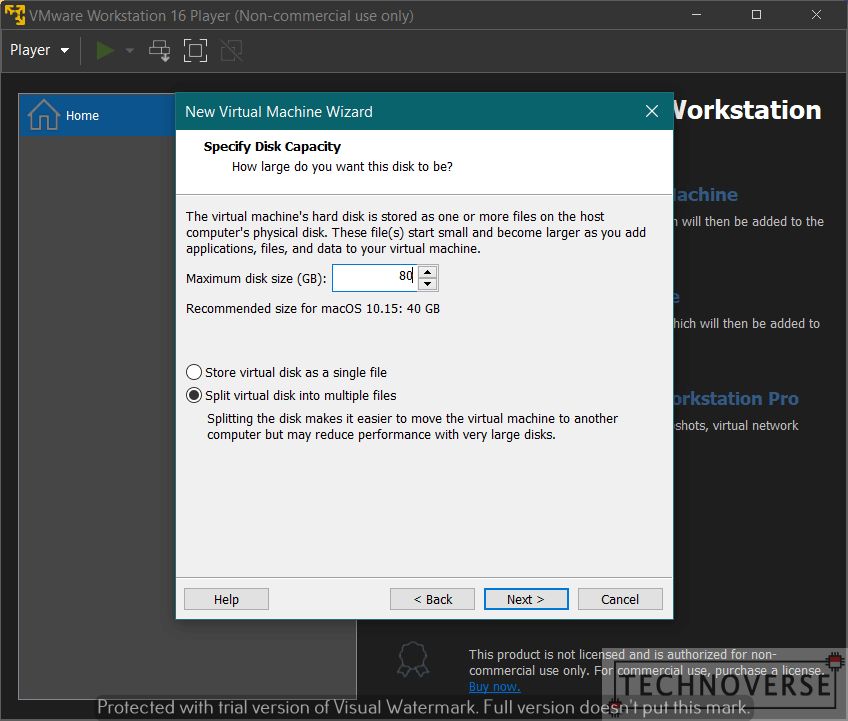
The adjacent pace is to cull the deejay capacity. By default, 40GB volition be selected. Nevertheless, if you wish to upgrade to Big Sur later, you might want to add 80GB. If you're non sure how much you need, don't worry, you tin can easily add together more space after. Likewise, in that location's a choice to whether yous want to save your disk as a unmarried file, or split information technology into multiple files. I went with the default pick.
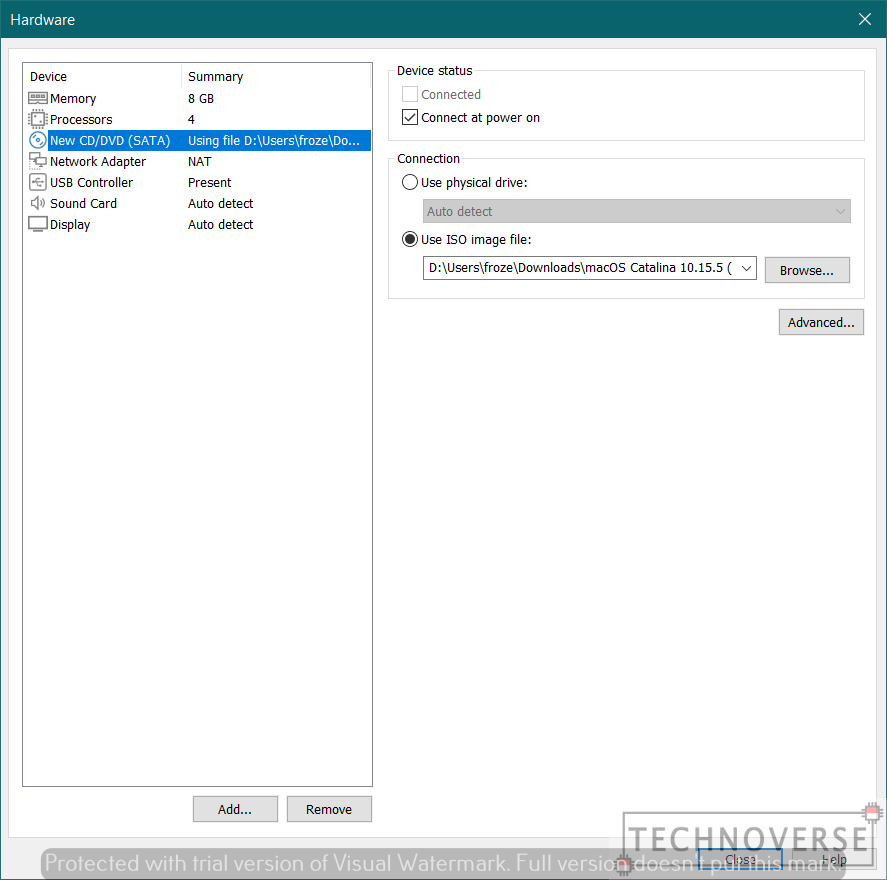
Finally, y'all'll be taken to the Summary page. Notwithstanding, don't click finish just yet. Past default, the VM is configured to accept 2 cores, 4GB of RAM. We will configure this to iv cores (since, every bit mentioned before, my CPU has 8 logical cores thanks to hyperthreading) and 8GB of RAM for more operation. Click Customize Hardware to start making changes to the default configuration. Or, if you wish to modify your configuration at a later fourth dimension, you tin access it from Edit Virtual Machine settings when you select your VM
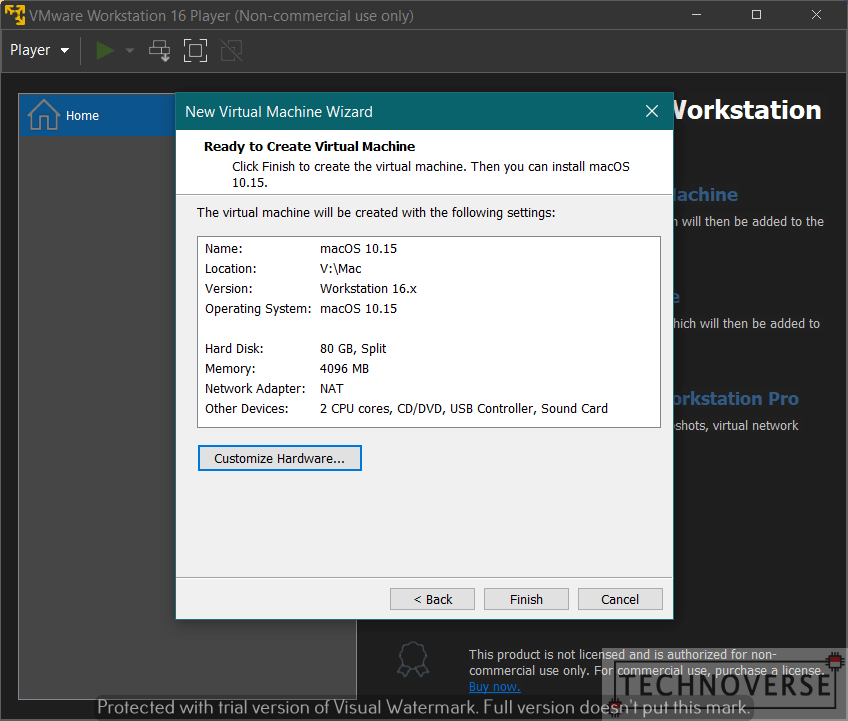
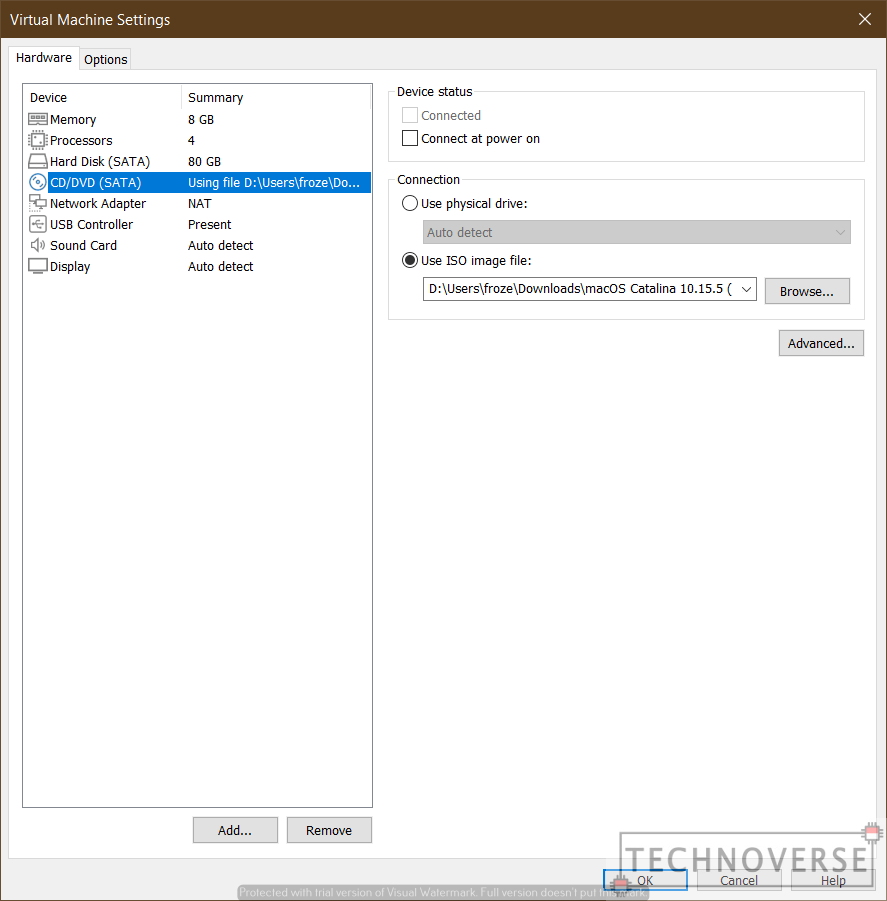
Oh, also, don't forget to "insert" the ISO disc into the VM. Y'all tin do this by accessing the New CD/DVD (SATA) menu on the correct, then check the Connect at Ability On. Choose the Use ISO image file pick and select the ISO prototype you downloaded earlier. This should automatically tell the VM to kick from the disc, since no OS is installed.
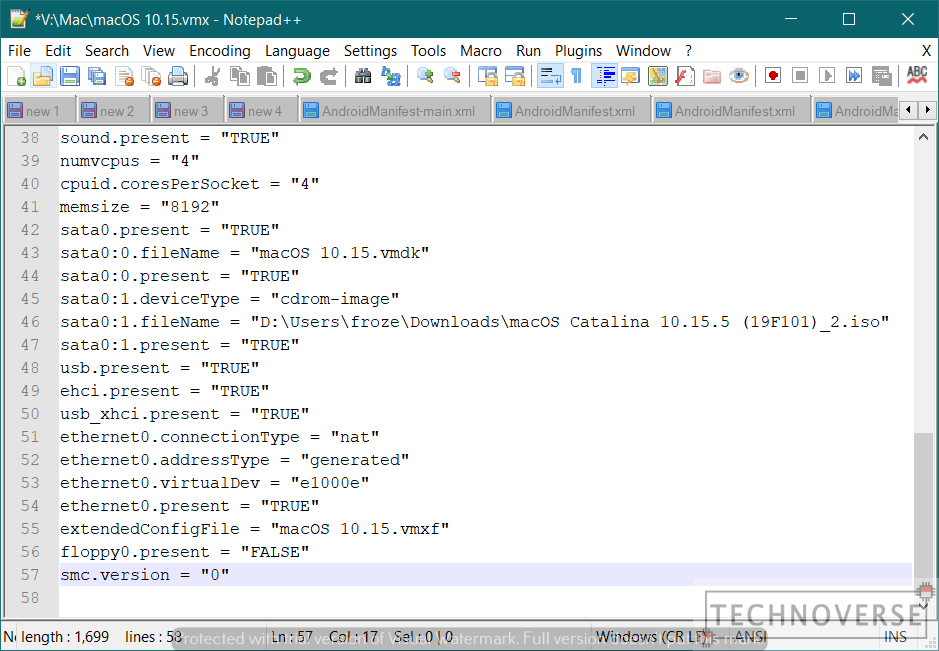
One time yous're done tinkering with RAM, CPU Cores, and everything else, click Finish. The next thing you lot'll need to do is to update your VM settings' directly. Go to your VM's directory, and look for a .vmx file. Open it with your favorite text editor (or Notepad, if you lot don't take any), and add the following line: smc.version = "0". Save the file, and yous're ready to install macOS.
Install macOS

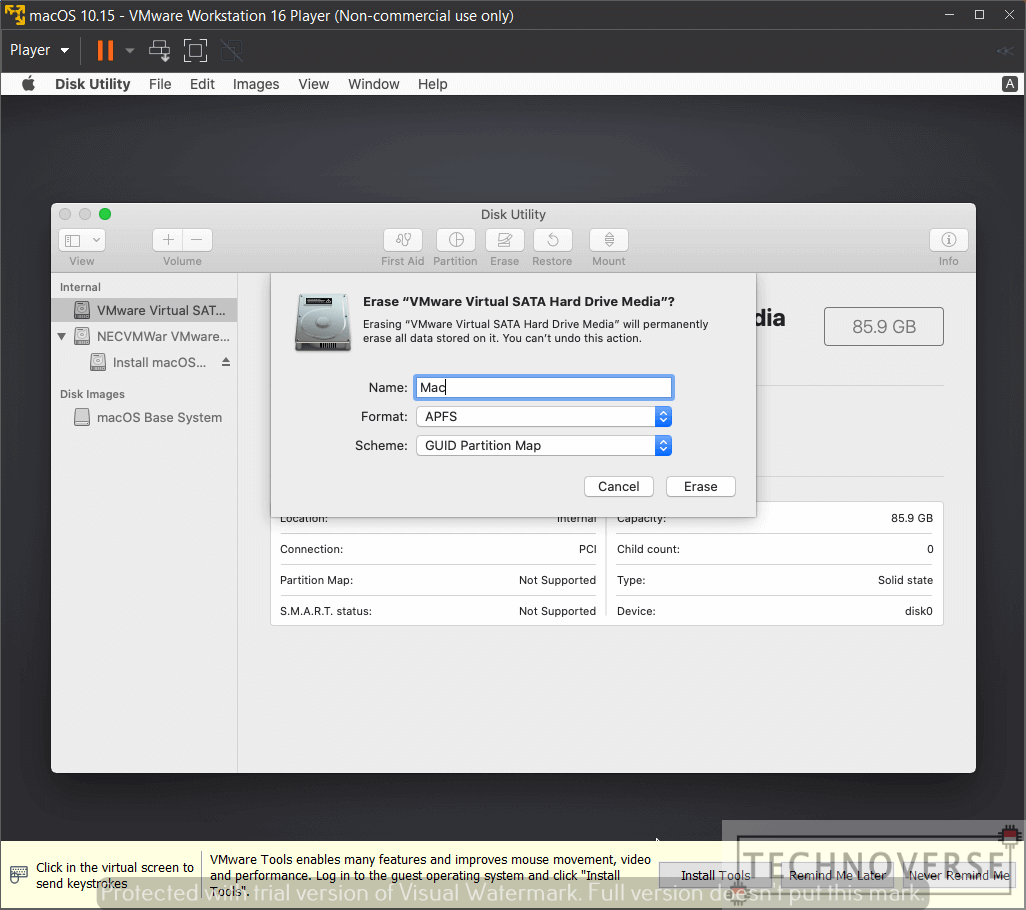
At present, if everything goes correctly, the VM should boot to macOS Utility, where y'all have a range of options. The first thing you should do is to format your disk. Go to Disk Utility, and erase the disk you configured in the previous step. This is needed because past default, VMware formatted the deejay as NTFS, something that macOS cannot (or at least, decline to) install on. Nosotros need to reformat information technology to APFS.
Once that'south washed, we tin brainstorm installing macOS. Follow the steps written in the installer, and go get some coffee while it's installing. It's going to accept a while.
One time the installation is done, don't forget to disconnect the virtual optical bulldoze, as nosotros don't need them anymore.
Install VMware Tools on macOS
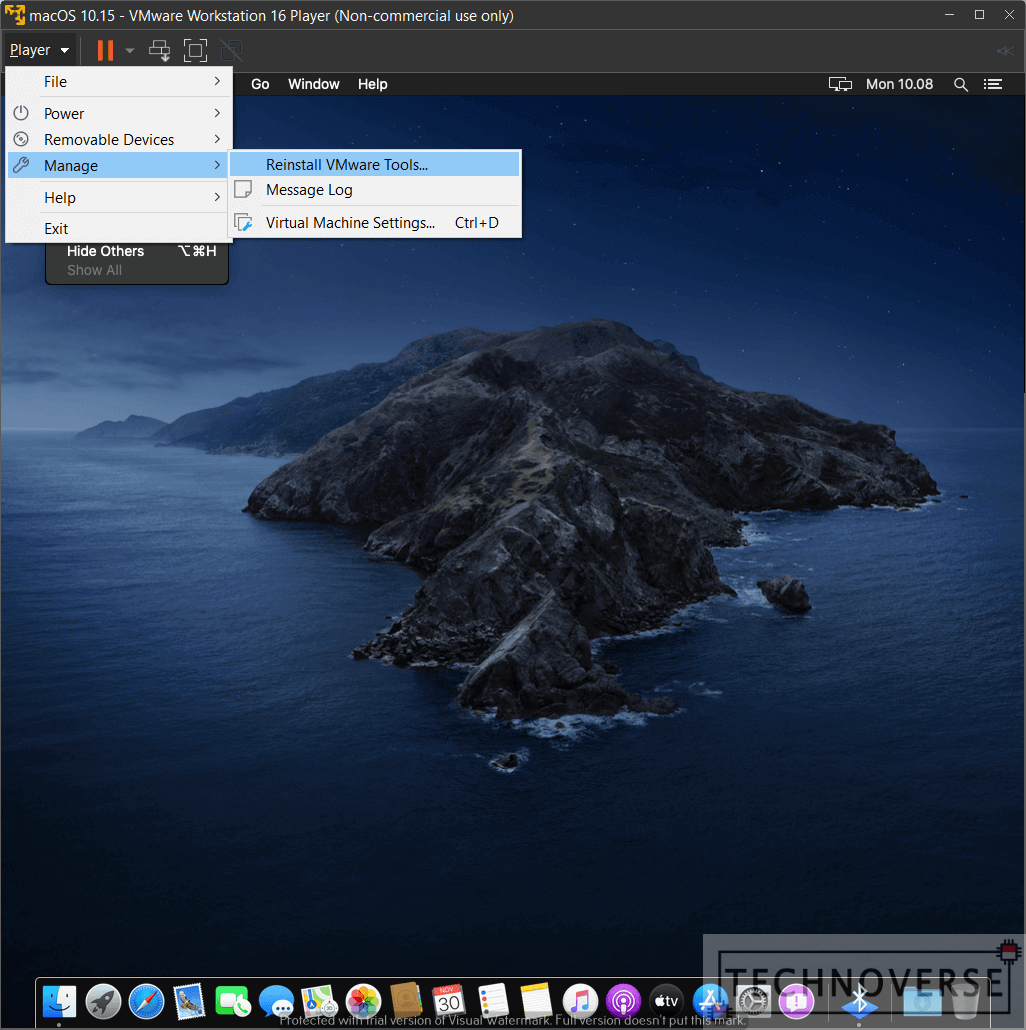
In one case yous're done with the installation, the next thing you should practice is to install VMware tools. From what I understand, VMware tools volition improve the performance of your VM. One such improvement is the ability for your VM's resolution to adapt to the window size. Additionally, graphics memory is besides enhanced from measly 32MB to more-generous 128MB.
Installing is simple. When your VM is on, click on the Player menu on the summit-left side of the VM Window. Choose Manage, then Install VMware Tools. Afterward, a virtual disc will announced in your Mac. Open that disc, click the installer, and follow the instructions. Afterwards, restart your VM.
Start Tinkering!
Congratulations! You now have a fully-working VM running macOS. Beginning experimenting on it! Install apps, install updates, gear up your Apple ID and accessories. See if running your routines in a VM works for you or you lot need something more powerful. In that example, I'm afraid you'll accept to either go Hackintosh, or get a real Mac.
Caveats
While testing the VM for a couple of weeks, I noticed a few caveats that may or may non be a deal billow:
Graphics Memory on macOS is Limited to 128MB
Yes, you read that correct. Long story short, yous cannot employ 3D acceleration on Macs via VM. Quoting a resource that I read, manufacturers will need to submit drivers to Apple to allow its usage on macOS. Since technically, what nosotros're doing is borderline illegal, there'southward no obligation for Apple to take graphics driver from VMware. Hence, the limitation. From what I heard, this issue also happens in VirtualBox.
Therefore, due to this limitation, please don't expect bang-up operation in graphic-intensive apps similar games, photograph, and video editors. Streaming YouTube videos is fine, only when I tried running Android emulator, it runs literally similar a ho-hum-motility video.
For reference, my office-issued 13″ 2017 MacBook Pro has 1.5GB of graphics retentivity, and so animations are much, much smoother.
Re-Apply Unlocker later Every VMware Update
I accidentally updated the Workstation Role player a few days ago, and my VM of a sudden froze. After desperately searching for a workaround, I institute out that I needed to re-apply the unlocker over again. I assume that you'll demand to do the aforementioned after every update.
Resource Sharing between Windows and macOS
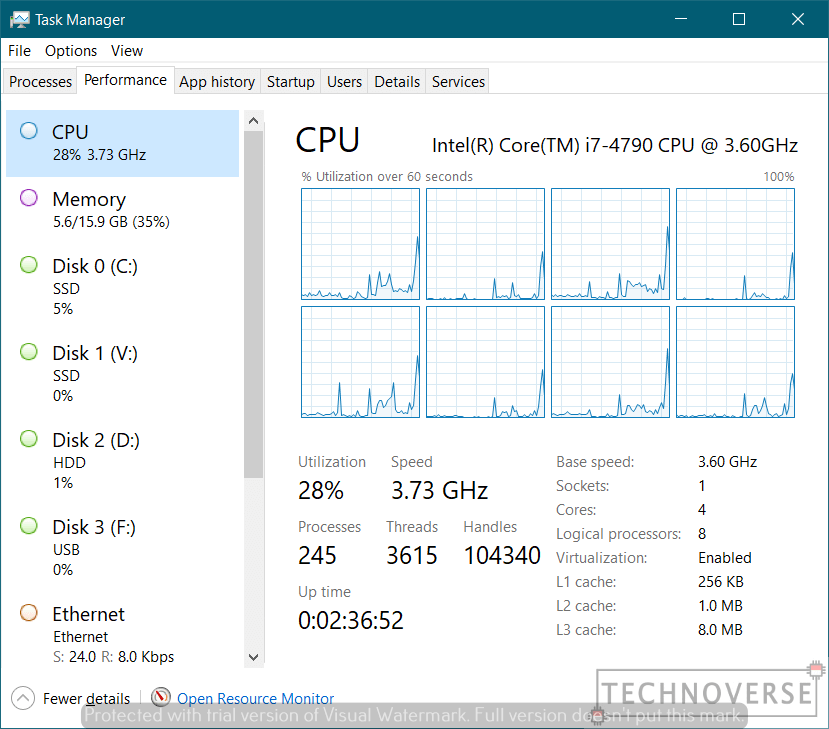
As mentioned before, running a VM means your host PC is sharing its resource with the VM. Meaning that yous might non have every bit much RAM as you had when the VM is not running. Keep this in mind whenever the VM is running, and you're doing something else in the host PC. Too, if you're a developer like me, brand certain to spotter your VM's remaining storage infinite. Caches and developer tools can suck space like at that place'south no tomorrow.
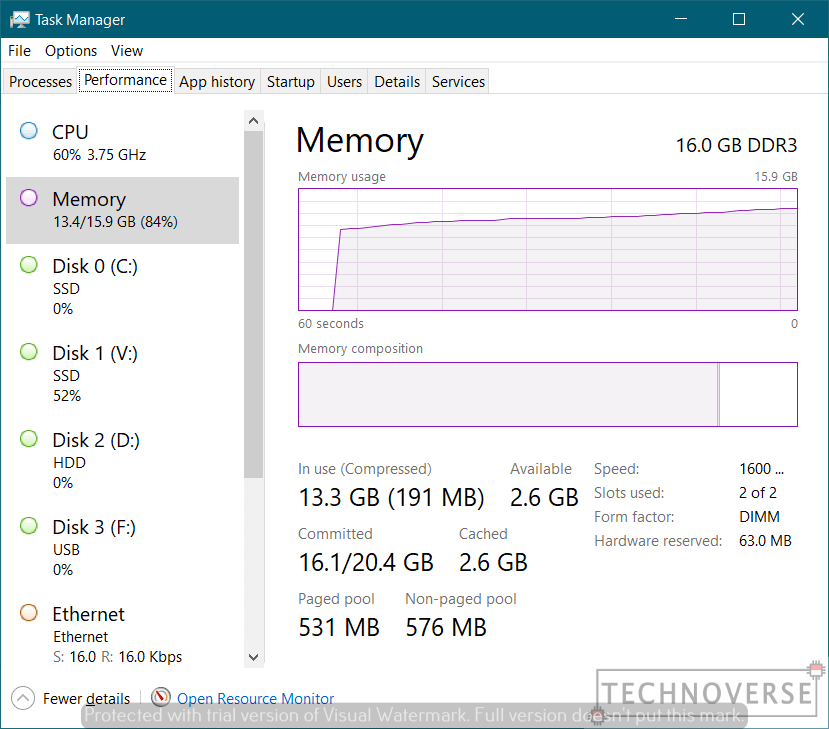
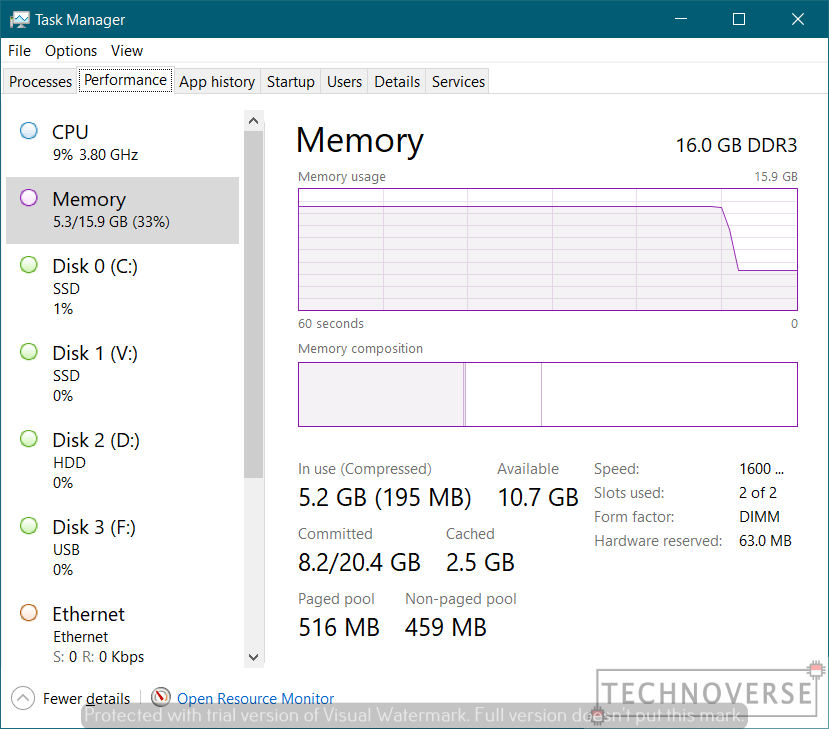
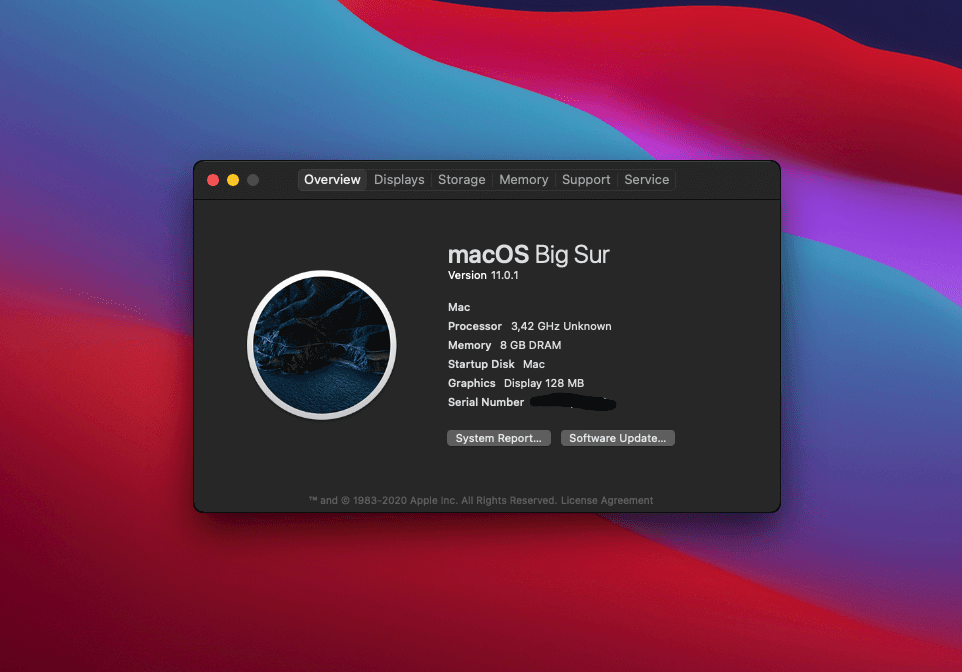
Every bit you lot tin can meet in a pair of pictures above, the VM reserves 8GB of retentiveness when information technology'due south on. Oddly plenty, it's not listed anywhere in Task Manager's Processes tab.
Conclusion
Mac VM can be an alternative to buying the real Mac, merely with a few caveats. If you wish to try out the OS or practice some quick tinkering, I remember it'southward skilful plenty. All the same, if you're a power user or a professional that needs everything a Mac has to offer, I advise you invest in a real Mac. It'south worth information technology, every bit far every bit my feel goes.
Well, I judge that's all for now, Folks. It's the kickoff article after a while, and I think I tin come up with a few ideas for more posts. Stay tuned 😉
As usual, thanks for reading, don't forget to ask your questions or comments below, and encounter you in the next article. Stay rubber, stay sane, stay healthy!
Mac Os X Download for Vmware Player
Posted by: toiwhamess.blogspot.com
![Download Smadav PRO 2022 Rev 13.7 Crack + Registration Key [Latest] FREE](https://1.bp.blogspot.com/-FxxoZkxtk_U/WKAvV2Gd6iI/AAAAAAAACd0/UTrLC-1x23k1E0oqRLErM2XliW2XDiBlQCK4B/s1600/dif.jpg "Download Smadav PRO 2022 Rev 13.7 Crack + Registration Key [Latest] FREE")


0 Komentar
Post a Comment